Latest Posts
- Miscellaneous Map Matters [en]
 Back in March, I’ve been skiing/snowboarding in Livigno for the first time. I had heard good things about it in the past, but there are just so many other ski-resorts closer to where I live. I wasn’t disappointed. They have two small ski areas, that are not linked together. But there is a lot of open terrain and several well-maintained snow-parks. We were also super lucky with snow-conditions and …
 - How I love Apps! [en]
 I’m a little techno-skeptical at times. And the concept of (mobile/native) apps has bothered me ever since the first true smart-phones popped up 20 years ago. The word “app” is annoying in itself: we’ve had software “applications” for decades. And we’ve had software package managers, too. Then someone comes along, hijacks the term “app”, puts them in a “store”, and acts like it’s this cool new thing. Ever since …
 - Apa Kabar, Lombok? [en]
 When I visited Indonesia back in 2003, I spent most of my time on the island of Lombok. On my latest trip, I saved Lombok for the last three weeks. I sorta knew what to expect there, so travel planning was less of a hassle, as compared to Sumbawa or Flores/Komodo. The phrase “Apa kabar?” means “How are you?” in Bahasa Indonesia. The answer is usually “baik” or “bagus”. …
 - Shoot yourself in the foot: WordPress UAM vs. HTTP Cache Headers [en]Ever since I had reactivated this blog a couple of years ago, I noticed that something was wrong with its content caching. On each page reload, the browser would download all images from scratch. Even though it should have been easy to cache these images. There are various standards govern how web browsers should cache resources. And, which HTTP response headers web servers can set to advise on desirable …
Continue reading “Shoot yourself in the foot: WordPress UAM vs. HTTP Cache Headers [en]“
- Komodo & Flores – Last Chance To See? [en]
 It’s been a while since I’ve read Douglas Adams’ (et. al.) Last Chance to See, but I remember that it had Komodo Dragons in it. The German edition prominently features a Komodo Dragon on its cover, while the English editions feature the diverse animals that are discussed in the book in a more balanced manner. If I remember correctly, Adams was surprised how accessible Komodo Dragons were, as compared …
Continue reading “Komodo & Flores – Last Chance To See? [en]“
- Back to Wallacea: Sumbawa [en]
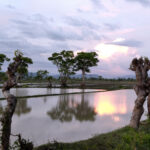 After my Singapore stopover, I headed straight to the Indonesian island of Sumbawa. Sumbawa lies between Lombok in the west and Flores in the east. Its location can be classified in many different ways. Amongst others, Sumbawa is part of the Pacific Ring of Fire, the Lesser Sunda Islands, the province of Nusa Tenggara Barat (NTB), and Wallacea. As a biology nerd, I find this latter classification the most …
 - Singapore Stopover – No Smoking, No Durians! [en]
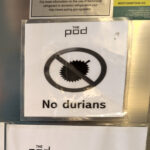 I hate air travel. I just cannot afford it. Nobody can. But many of us are doing it anyway. At least those who can afford it financially. Sadly, this includes myself occasionally. For damage control, I’ve self-imposed a flight reduction policy, which I’ve been trying to follow in recent years: In theory, my ongoing Indonesia trip adheres to this policy. However, bureaucratic constraints made it necessary to leave Indonesia …
Continue reading “Singapore Stopover – No Smoking, No Durians! [en]“
- Bali Picdump [en]
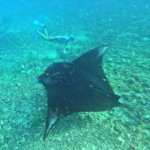
 I’m currently on a trip to Indonesia. I’ve spent the first month on Bali, mostly surfing. But I’ve also had a chance to do some other tourist activities. So, let’s dump some pictures here, with just a little textual context… Uluwatu Uluwatu (on the Bukit peninsula in Bali’s south) has some of the most popular surf spots on Bali. While I didn’t surf there myself, I dropped by to …
 - Once upon a time in Indonesia [en]
 Today I’m on my way to my yearly surf-trip. This year it’s gonna be Indonesia. My third trip to the country. I might share some impressions later. But right now, I want to revisit my first trip to Indonesia. That was more than 20 years ago, back in 2003. It was my first big journey without my parents. We were a group of 6 friends, all students with loads …
 - Shoot yourself in the foot: Docker, Nextcloud & git [en]I did something stupid again. I noticed it, when I received notifications from my Prometheus monitoring. The probe that sends HTTP requests to my Nextcloud server was failing. Strangely, no other probes were failing. No high load, no memory exhaustion, no filesystem running full. Manual testing confirmed that all my other web-apps worked as expected, only Nextcloud was responding with 502 errors. It looked like my nginx reverse-proxy could …
Continue reading “Shoot yourself in the foot: Docker, Nextcloud & git [en]“